Published
- 9 min read
An HTTP Primer for Embedded Developers

Modern embedded devices often connect to the internet; this is what’s known as the Internet-of-Things (IoT).
If you know a bit about embedded programming and the idea of connecting a device to the internet is a little magical and yet daunting, don’t fret (worry) - you are not alone.
Electronics people are good at scouring through data sheets and circuit diagrams and can gather information quickly. However when trying to figure out the HTTP protocol, there is so much to learn and so many unfamiliar terms to get to grips with that it may seem like an impossible task.
The good news is that it is not as hard as it seems.
In this article we will cover the basics of HTTP from the perspective of an embedded developer. My aim is that by the end of this article (and video) you will have a good understanding of HTTP and how it can be used in embedded systems.
But first, a little rant:
IoT RANT
If you do a Google search on “Why IoT has failed”, you may be surprised at the amount of IoT projects that have failed as well as why the “promise” of IoT has fallen short. There are many “reasons” given including “lack of partnership” or “lack of planning” or “not understanding the core business objectives”. These failures are universal to many businesses, especially startups throughout all sectors, and are not good reasons to single out IoT projects. In other words, it’s not that IoT has failed, it’s that some business problems are universal and any project can fail.
Using the information in this blog, I hope you can avoid some of the pitfalls and achieve success.
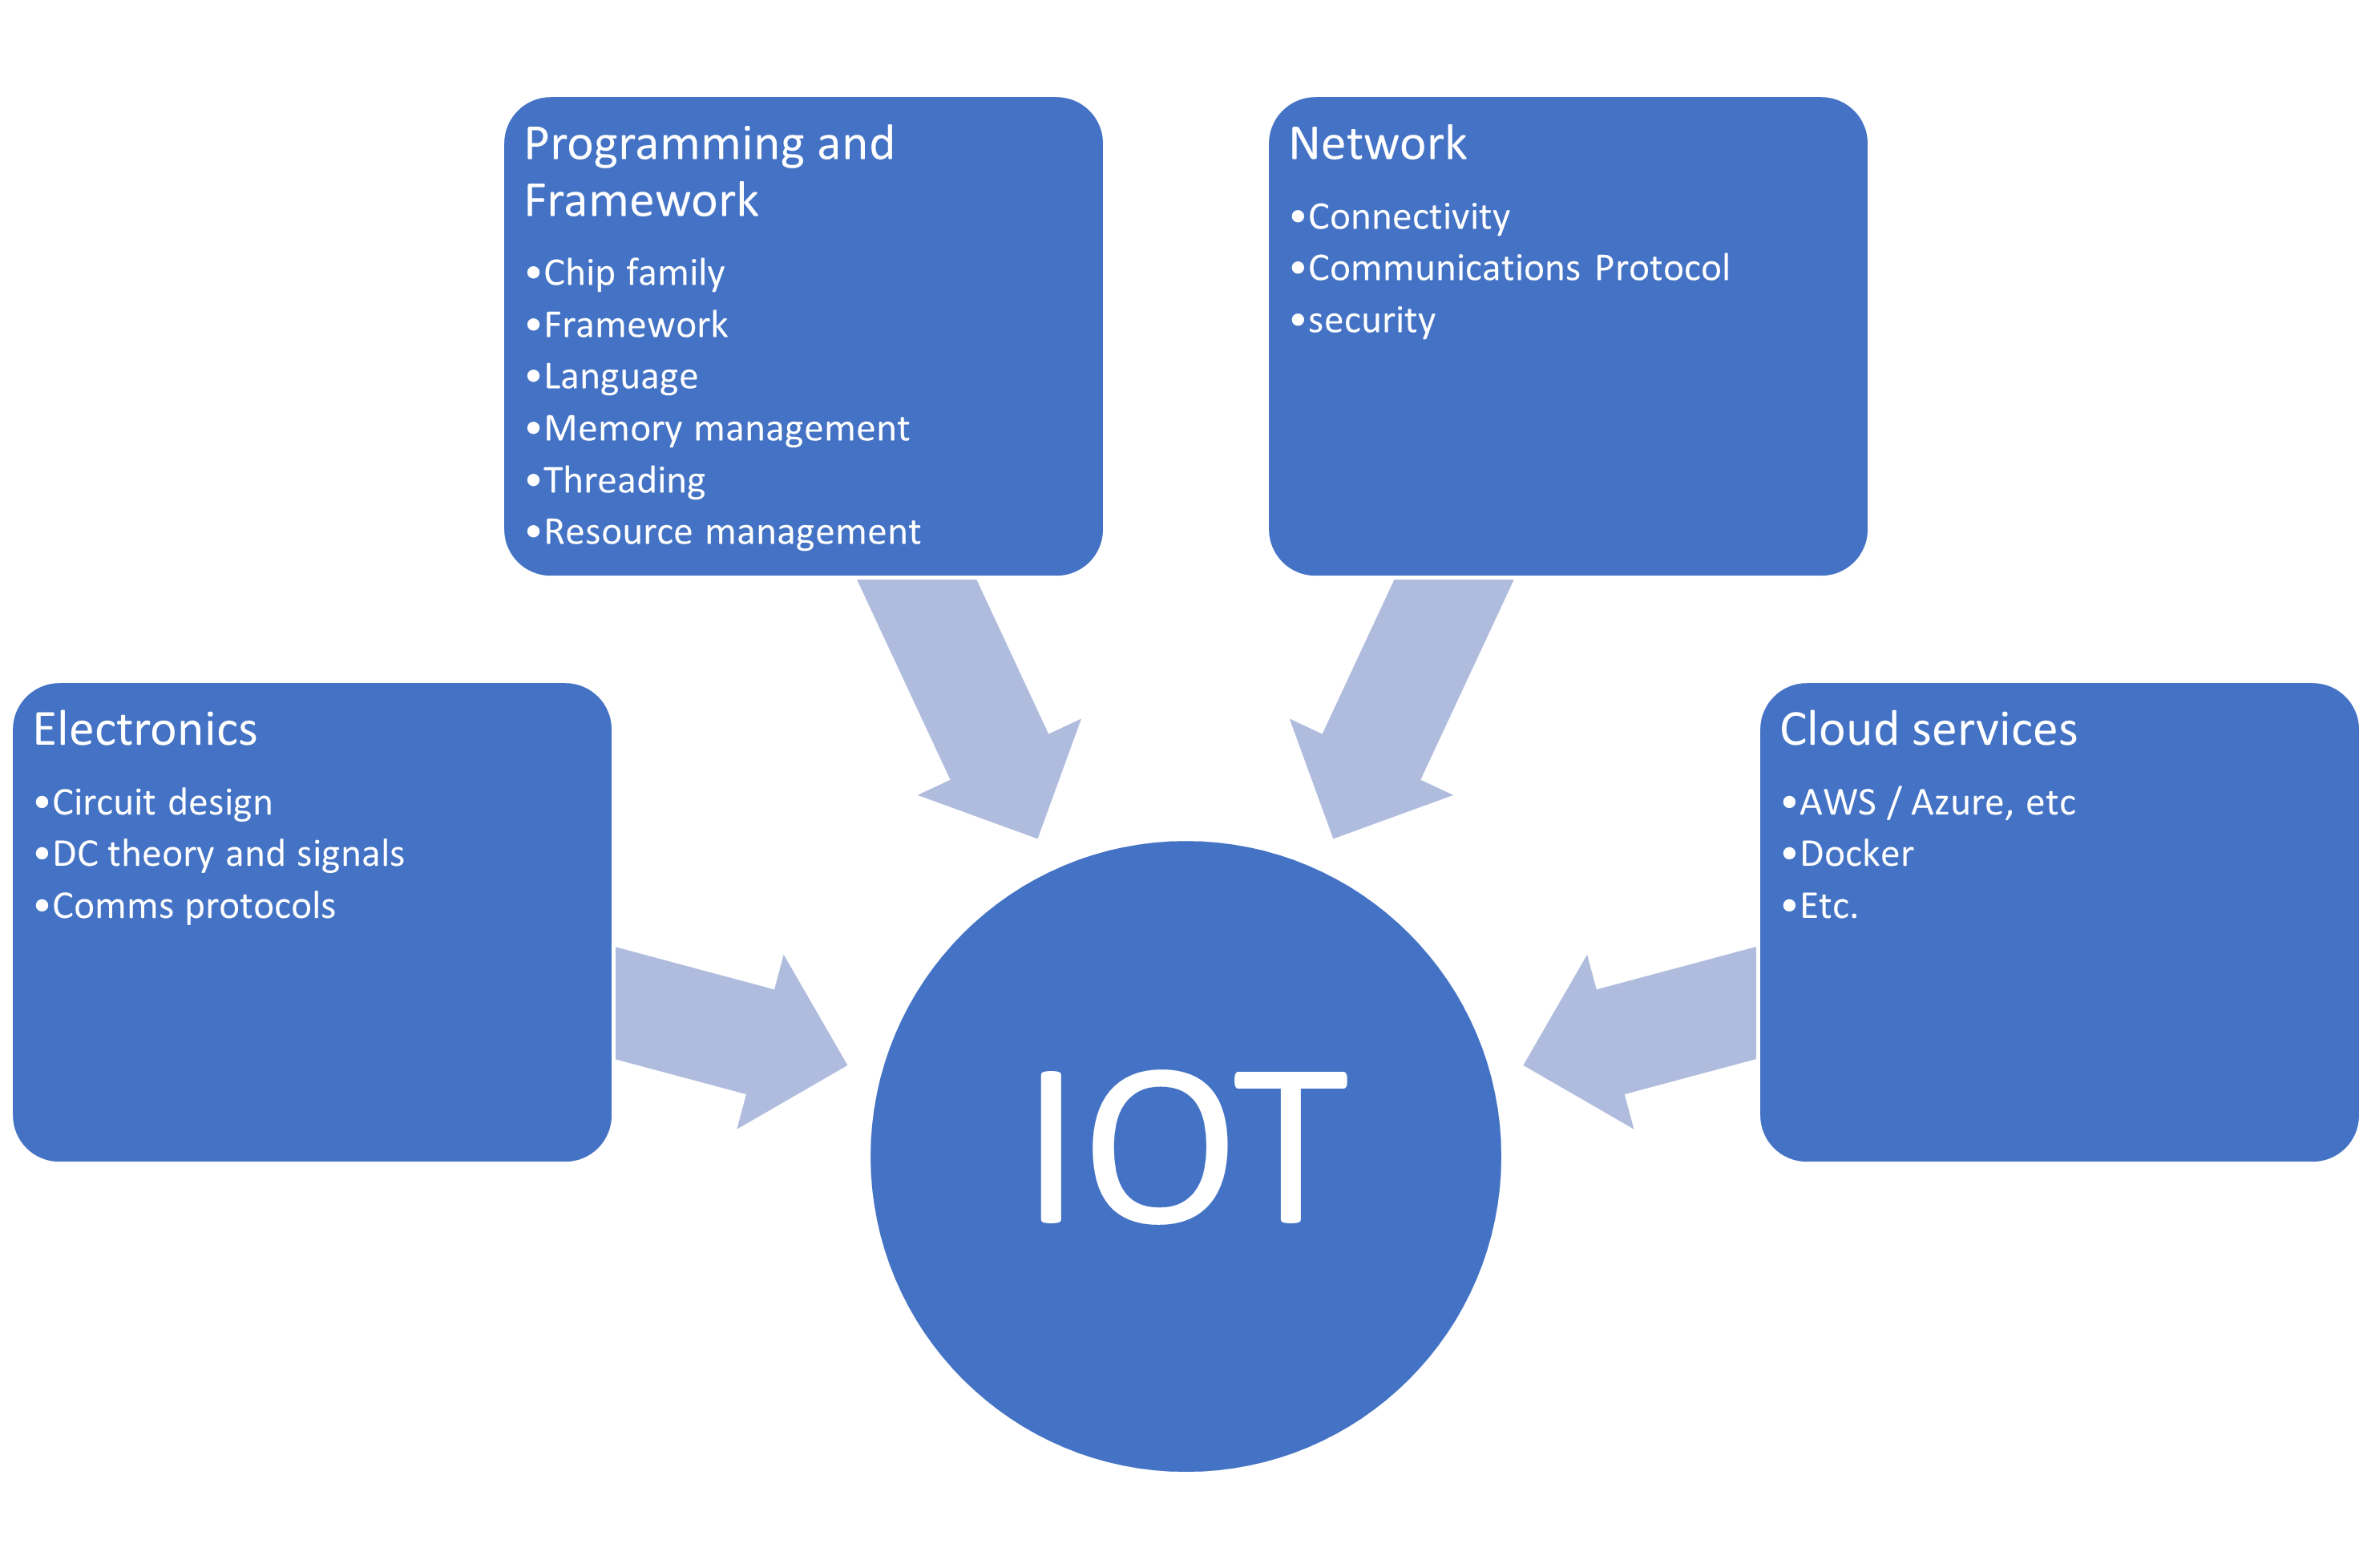
Going back to basics, an IOT project has 4 core disciplines:
1. Electronics
- Read and create schematics
- DC circuits and signals
- Communication protocols, including i2c SPI UART etc.
2. Programming and frameworks
- Chip family (PIC, STM, Nordic, ESP32, etc.)
- Framework (IDF, Arduino, Micro-Python, Zephyr, etc.)
- Language (C, C++, Python, Rust, etc.)
- Memory management
- Multi-tasking / threading
- Resource management and power considerations.
3. Networking
- Connectivity (WiFi, Ethernet, Bluetooth, Matter)
- Communication protocols (HTTP, MQTT, BLE, web sockets, etc.)
4. Cloud Services
- AWS, Azure, Google Cloud, etc.
- API’s
- Security
- Data storage and retrieval
From my observation, successful projects need a good cross section of skills. Depending on what is being built, some technologies will work better then others. There are times when a PIC using MQTT is perfectly adequate and there are times an an ESP32 needs to use web services and host its own web site. Having a broad knowledge of all possible options and how they work together will allow you to successfully tailor projects to requirements.
An expert who can create circuits and program a micro to communicate over the internet in a robust manner is a rare cat indeed. He is a multi-talented expert and should demand a high salary!
Why use HTTP?
Before going into this, let me ask the question:
“What can a 32-bit micro-controller do?”
 Traditionally, a micro-controller can sense / measure the physical universe. It can also change the physical universe with actuators, lights, motors, etc.
Now, let’s blend that with the Internet. All great inventions blend technologies. Even a car blends chemistry (fuel) with mechanics (the engine).
Nowadays there are all manner of new connectivity kids on the block. Matter and BLE Mesh are pioneering their way through smart sensors and connected light bulbs. However, the web is by far the biggest connected resource - you can get almost any information from the Internet. Most resources use simple API’s (Application Programming interfaces) to deliver data including cake recipes, football scores, sending emails / SMS’s, weather, and interacting with Chat GPT. Moreover, in the modern corporate world, web developers are at the forefront of exposing, securing and consuming relevant information through their own API’s.
In IoT we are giving our 32-bit micro controller the ability to talk to the whole world and interact with any information the human race has come up with. Knowledge is power. If our micro controller has access to any information, can use voice and visual recognition, send emails and ask an AI to write dad jokes for us, while simultaneously changing the physical universe to serve us better, then what can our micro controller do?
Answer: Anything you want it to.
HTTP Concepts
In computing we have this thing called a network socket. A network socket is a pipe between 2 computers that allows them to send and receive messages. There is a lot of infrastructure that makes this happen, but for now we don’t care about any of that. We have 2 computers that can talk to each other. If you ever uses a chat application like Discord or Whatsapp, you can get a good feel for what a socket is.
Stateful vs Stateless Sockets
In a chat application like Discord, when you log onto the server, you will stay connected. Your client (Discord application or browser) will hold the connection open to the server. When someone types something you can see action in your client. This is an interaction between their client and the server and back to your client. Interestingly, a constant connection is really nice for real time updates, but it comes with inherent complexity.
If you were to create an application with a socket between 2 computers you would need to think about things like:
- What happens if the client drops the connection?
- What happens if the server drops the connection?
- Each time a new connection is made from a client to the server, the server will need to keep information about each client in memory. How do you manage that memory?
HTTP gets away from all that complexity by keeping things stateless.
In a stateless connection you get the following sequence of steps:
- A socket is opened.
- Information is sent from the client to the server as a request.
- Information is sent back from the server to the client as a response.
- The socket is closed.
Finding the server that we need to open a socket with is done by pointing to it with the URL.
The Internet has special servers called DNS (Domain Name Servers) that look at the base of the URL (Uniform Resource Locator - address) and translates that into a computer’s IP (Internet Protocol) address. This is magic that happens behind the scenes. All we care about is that the first part of the URL, called the domain, is translated into an IP address (a computer sitting somewhere on the internet), and that our request is routed to that computer.
Sometimes a socket can be opened for a few requests and responses, but generally, when writing our application, we don’t care about the networking, sockets opening and closing, etc. Routing to the correct IP address is all taken care by the existing infrastructure so, to simplfy this, the HTTP protocol can be summed up as:
- Client sends a request (with some data),
- Server sends a response (with some data)
Easy!
The HTTP protocol dictates the information that needs to be in the request and in the response. By the time you finish reading this, and viewing the video, you will know everything you need to know about those pieces of information. So, let’s get into it.
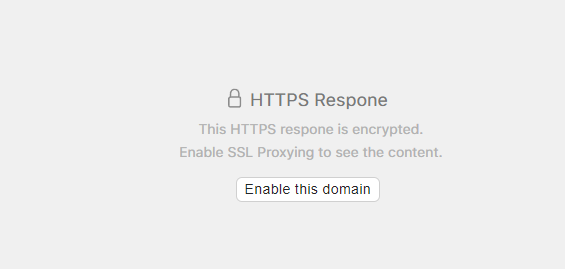
Unfortunately, viewing the raw requests and responses in Chrome is not supported. There are (free) tools like Proxyman which make it very easy. After installing it open a browser and go to https://google.com.
** If you run that tool for the first time, you may get an option to add the certificate. This is so Proxyman can decrypt the browser traffic. Once accepted, clear the history, refresh your page and you are good to go. **
 At the bottom you can see the request and response. If you click on RAW under the Request tab, you will see the raw text that was sent to the server. You can also select the RAW button on the response tab.
- N.B. we are looking at the text for observation and exploration. You DON’T have to remember the raw formats. All the SDKs (Software Development Kit) I’ve seen allow you to add parts of the request and take parts of the response in a developer-friendly way. *
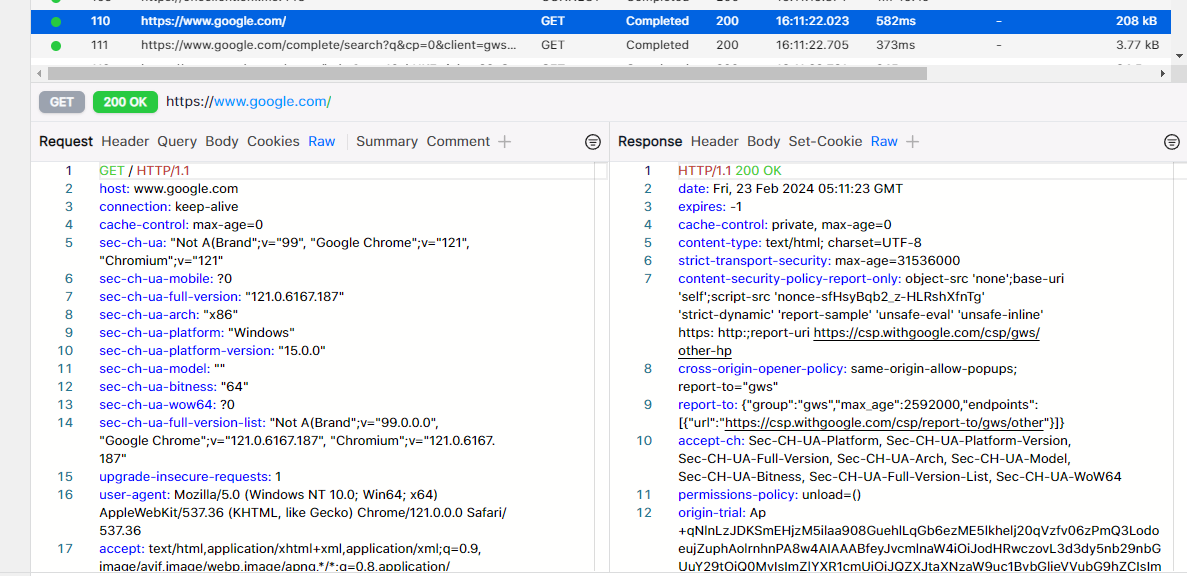 Let’s have a quick look at the request and response and pick out some interesting stuff.
Requests
-
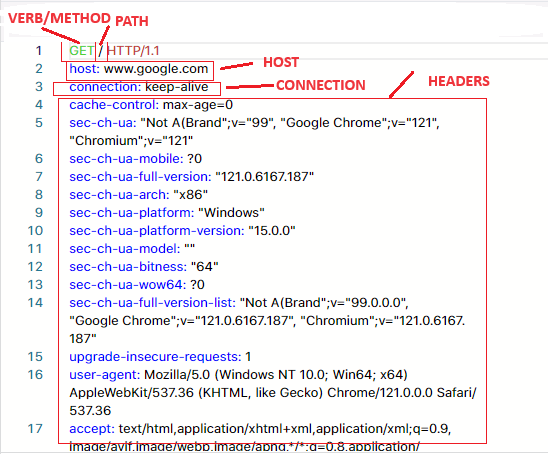
Method: The first thing is the method. This tells the server whether we are getting data, adding data, deleting data, etc. In this case its a GET for getting data.
-
Path: The second thing is the path - in this case we are going to the root path (/). If our URL was https://www.google.com/cats our path would be cats/. This tells the server what part of the application the client wants to address.
-
Host: The host is our domain and the primary server we are talking to, which in this case is https://www.google.com
-
Connection: This establishes the type of connection. By default the socket would automatically close. Keep Alive means “Don’t close the connection, more requests are coming.”
-
Header Information: The rest of the stuff is header information. This is metadata that tells the server all sorts of information, which is covered in much more detail in the video.
Response
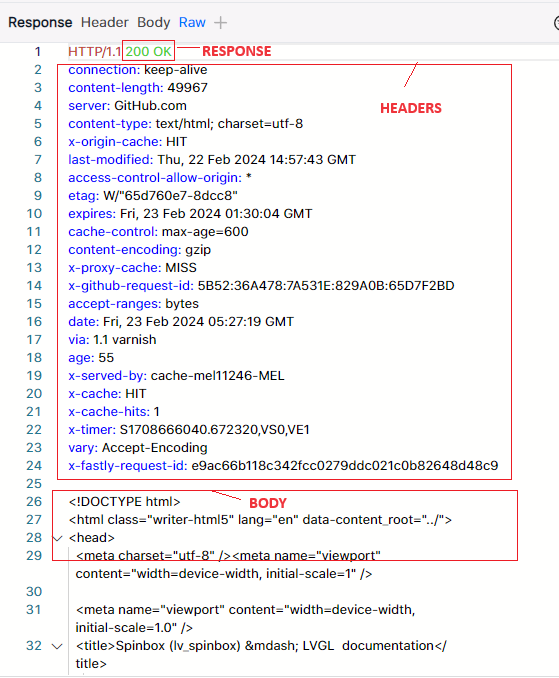
-
Response Code: This tells the client if everything was OK or if there was some error. In this case, 200 means the request was OK 👍
-
Headers: Then we have header information that tells the client information about the content.
-
Body: This is the body of the response. In this case its the raw HTML that will be drawn on the screen in the browser.
In the browser context, after the HTML is drawn on the screen, the HTML itself will point to other resources like JavaScript, style sheets, images, etc. These, in turn, are requested and responded to and we can see that in our HTTP sniffer (i.e. Proxyman).
If I hit the homepage of https://learnesp32.com, I get the following:
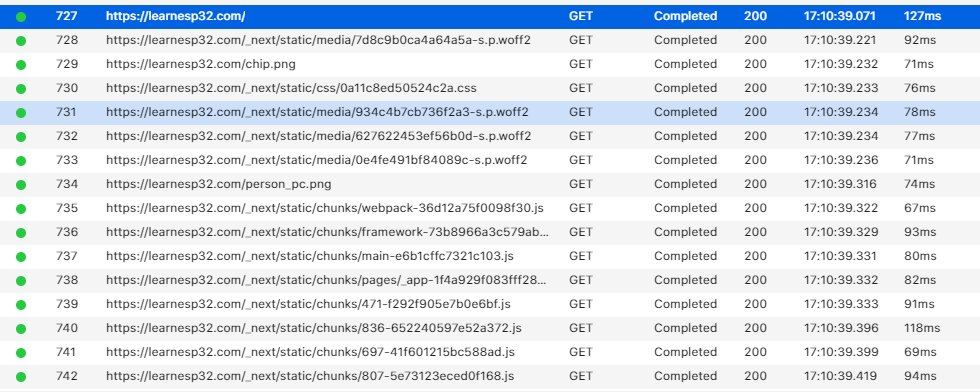 See if you can spot the JavaScript files, style sheets(css) and images.
OK - Let’s Dive In
Alright! so thats a brief primer on the theory of HTTP protocol. Let’s get a little deeper and start getting our hands dirty so we can apply what we know and make it useful.
To do that, watch this video:

Enjoy!