Published
- 6 min read
ESP and AWS-S3 Integration part 2: use AWS-S3 with the ESP32

This is the second blog post of this series where we use an AWS-S3 bucket with the ESP32.
- In the first post we look at how to set up a bucket
- In the second post (this post) we look at how to use the AWS-S3 library and how it works
In this post we look at how to use the library
How to use it
upload and download and OTA
- clone the repository with
git clone https://github.com/Mair/esp-aws-s3-auth-header.git - open the menuconfig and go to “Example Connection Configuration”
- set your WIFI SSID and password and save your changes
- open main.c and adjust the hash defines
#define AWS_ACCESS_KEY "MY_IAM_ACCESS_KEY"  // your IAM access key
#define AWS_ACCESS_SECRET "MY_IAM_ACCESS_SECRET"  // your IAM access secret
#define URL "https://esp32-demo-bucket.s3.amazonaws.com/test.txt" // your file URL to create and read
#define HOST "esp32-demo-bucket.s3.amazonaws.com" // your bucket host
#define REGION "us-east-1"  // your bucket region
#define CANONICAL_URI "/test.txt" // your file name
// once you compile this code, upload the binary to your bucket and change this URL for OTA
#define OTA_URL "https://esp32-demo-bucket.s3.amazonaws.com/aws-s3-auth-headers.bin"
#define OTA_CANONICAL_URI "/aws-s3-auth-headers.bin" // the name of the binary file for OTA
most of these are pretty self explanatory.
- HOST: is the part of the URL after
https://and before the/. its the name of your bucket appended with.s3.amazonaws.com - CANONICAL_URI: is the name of the file path beginning with a
/For our purposes and to keep things simple keep it lower case and avoid using spaces and special characters - URL, REGION, AWS_ACCESS_KEY AND AWS_ACCESS_SECRET were covered in the previous post
- Compile the application with
idf.py build - For OTA to work navigate to your build folder and find your binary output which in this case will be aws-s3-auth-headers.bin and upload it into your bucket.
- flash and monitor the chip with
idf.py flash monitor
The output should look as follows
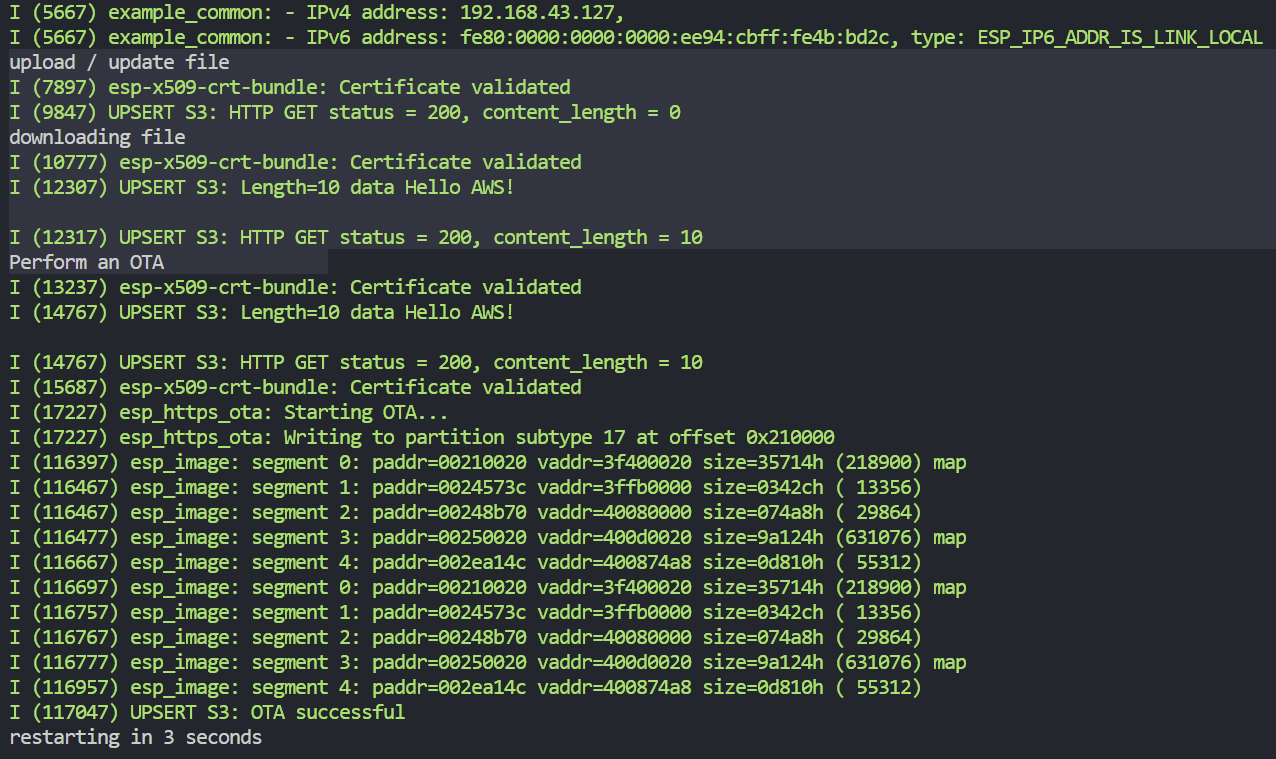
add code to your own project.
you can add the code to your project by copying the components directory into your project or, if you already have a components director, copying the components/aws_s3_auth_header into your components directory then, looking at main .c find the relative call to upload, download or do an OTA and call the function in a similar manner.
       void upsert_file()
{
    esp_http_client_config_t esp_http_client_config = {
        .url = URL,
        .method = HTTP_METHOD_PUT,
        .event_handler = on_client_data,
        .crt_bundle_attach = esp_crt_bundle_attach
  };
    esp_http_client_handle_t client = esp_http_client_init(& esp_http_client_config);

  char * content = "Hello AWS!";
    s3_params_t s3_params = {
        .access_key = AWS_ACCESS_KEY,
        .secret_key = AWS_ACCESS_SECRET,
        .host = HOST,
        .region = REGION,
        .canonical_uri = CANONICAL_URI,
        .content = content,
        .method = "PUT",
        .should_get_time = true
  };
  http_client_set_aws_header(client, & s3_params);
  esp_http_client_set_post_field(client, content, strlen(content));
  esp_err_t err = esp_http_client_perform(client);
  if (err == ESP_OK) {
    ESP_LOGI(TAG, "HTTP GET status = %d, content_length = %lld",
      esp_http_client_get_status_code(client),
      esp_http_client_get_content_length(client));
  }
  else {
    ESP_LOGE(TAG, "HTTP GET request failed: %s", esp_err_to_name(err));
  }
  esp_http_client_cleanup(client);
NB. The date / time must be set on the chip in order for the authorization header to be correctly created. looking above you can see the .should_get_time = true this will use NTP to set the date and time of the chip. This should only be done once and only if the date / time of the chip was not already set. Once set, all future settings should have .should_get_time = false
How it works
There is a fair bit of work to get an s3 valid header. The details of which can be found at http://docs.aws.amazon.com/general/latest/gr/signature-v4-examples.html. looking at that page you will see the following diagram

You can see the routine to create a signature is split into 4 steps. looking a little lower in the document you will see a brief description of each of these 4 steps as well as a 5th step were we use the created signature. Then, the document goes into detail about each step.
The 4 steps are stated as follows:
Step 1: Create a canonical request Arrange the contents of your request (host, action, headers, etc.) into a standard canonical format. The canonical request is one of the inputs used to create a string to sign. For details, see Elements of an AWS API request signature.
Step 2: Create a hash of the canonical request Derive a signing key by performing a succession of keyed hash operations (HMAC operations) on the request date, Region, and service, with your AWS secret access key as the key for the initial hashing operation.
Step 3: Create a String to Sign Create a string to sign with the canonical request and extra information such as the algorithm, request date, credential scope, and the digest (hash) of the canonical request.
Step 4: Calculate the signature After you derive the signing key, you then calculate the signature by performing a keyed hash operation on the string to sign. Use the derived signing key as the hash key for this operation.
there is a 5th step in adding the signature to the request
Step 5: Add the signature to the request After you calculate the signature, add it to an HTTP header or to the query string of the request.
If you have a look at the source code inside components\aws_s3_auth_header\s3_auth_header.c you will see comments that show where those steps are taking place.
void calculate_s3_header(char *amz_date, char *date_stamp, s3_params_t *s3_params, char *authorization_header, char *out_payload_hash)
{
    // See for details http://docs.aws.amazon.com/general/latest/gr/signature-v4-examples.html
    ...
    // step 1 create a canonical request
    // Step 2: Create a hash of the canonical request
    create_canonical_request(signed_headers, amz_date, s3_params, canonical_request_digest, out_payload_hash);
    ...
    // Step 3: Create a String to Sign
    char credential_scope[100] = {};
    sprintf(credential_scope, "%s/%s/s3/aws4_request", date_stamp, s3_params->region);
    ...

    // Step 4: Calculate the signature
    uint8_t signature_key[32] = {};
    get_signature_key(s3_params->secret_key, date_stamp, s3_params->region, "s3", signature_key);
    ...
    // Step 5: Add the signature to the request
    ...
looking inside create_canonical_request you can see the following
void create_canonical_request(char *signed_headers, char *amz_date, s3_params_t *s3_params, char canonical_request_digest[65], char *out_payload_hash)
{
    // Step 1: Create a canonical request
    char canonical_headers[200] = {};
    sprintf(canonical_headers, "host:%s\nx-amz-date:%s\n", s3_params->host, amz_date);
    ...
    // step 2 create a hash of the canonical request
    get_sha256_as_string(canonical_request, canonical_request_digest);
}
you can read each step in detail in http://docs.aws.amazon.com/general/latest/gr/signature-v4-examples.html and follow the code along.
moving forward
The library is a good start. It could use some improvements and if you would like to add a pull request to be able to use this with Arduino or other improvements I’de be most grateful.